Stop Leaks! Install Your Condensate Pump Drain Line Now

Excess condensate from HVAC systems, often handled by a condensate pump, can lead to significant water damage if not properly managed. One critical aspect of this management is understanding how to install a condensate pump drain line, which prevents leaks and ensures proper drainage. Homeowners, especially those dealing with basements, should recognize the importance of a correctly installed drain line to avoid potential structural issues and mold growth. This guide provides a clear pathway for correctly installing this vital component.

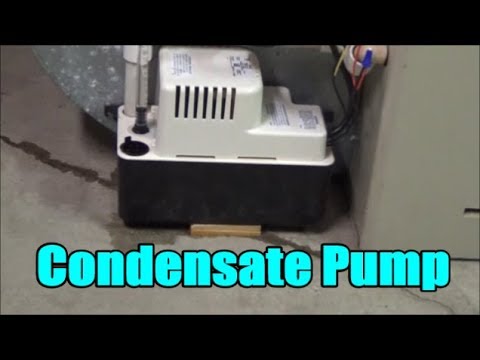
Image taken from the YouTube channel How To with Lech , from the video titled How to Install a Condensate Pump - Little Giant, etc. (full steps with drain hose install) .
Stop Leaks and Protect Your Home: A Guide to Condensate Pump Drain Lines
Water damage is a homeowner's nightmare. Often insidious and unseen until it's too late, it can lead to costly repairs, mold growth, and structural issues.
While many potential sources exist, one often-overlooked culprit is the condensate drain line from your air conditioning (AC) or HVAC system. A seemingly minor leak can, over time, cause significant damage.
The purpose of this article is to illuminate the critical role of a properly installed condensate pump drain line in preventing these problems and to provide you with the knowledge to address them.
The Hidden Threat: Condensate Leaks and Water Damage
Air conditioning systems work by cooling air, a process that inevitably produces condensation. This moisture, known as condensate, needs to be effectively removed from the system to prevent damage.
Without a properly functioning drain line, this condensate can accumulate and leak, leading to a variety of problems:
- Water Stains: Visible stains on ceilings, walls, or floors are often the first sign of a condensate leak.
- Mold and Mildew Growth: The damp environment created by leaks is ideal for mold and mildew, which can pose serious health risks.
- Structural Damage: Over time, persistent leaks can weaken building materials, leading to costly repairs.
- Damage to Electronics: Leaks near electrical components can create dangerous hazards.
The Condensate Pump's Crucial Role
The condensate pump is the workhorse of the system, responsible for removing the condensate produced by your AC unit or HVAC system. It collects the water and pumps it away through a drain line to a suitable discharge point.
However, a pump is only as good as its installation and drainage system. A malfunctioning or improperly installed drain line negates the pump's effectiveness.
This is why a well-functioning drain line is so essential. It's the final step in ensuring that condensate is safely and effectively removed, preventing potential water damage.
What You'll Learn in This Guide
This article serves as a comprehensive guide to understanding, installing, and maintaining your condensate pump drain line.
We'll break down the process into manageable steps, covering:
- Understanding the Basics: Defining key terms and explaining how the condensate system works.
- Essential Tools and Materials: Providing a comprehensive list of everything you'll need for the job.
- Step-by-Step Installation: Guiding you through the installation process with clear and concise instructions.
- Troubleshooting Common Issues: Addressing potential problems and providing solutions.
- Preventative Maintenance: Outlining steps to keep your system healthy and prevent future problems.
By the end of this guide, you'll be equipped with the knowledge to protect your home from the damaging effects of condensate leaks.
Understanding Your Condensate System: The Basics
Before tackling the installation of a condensate pump drain line, it’s crucial to grasp the fundamentals of your condensate system.
Think of it as learning the language before embarking on a journey; understanding the components and their roles will make the installation process far smoother and more effective.
Let's demystify the system, defining key terms and outlining how each part works to keep your home dry and protected.
What is Condensate? The Byproduct of Cooling
Condensate, in the context of your air conditioning (AC) or HVAC system, is simply water that forms as a result of the cooling process.
Air conditioners don't just lower the temperature; they also dehumidify the air.
As warm, humid air passes over the cold evaporator coil in your AC unit, moisture in the air condenses – much like dew forming on a cold glass of water.
This condensation collects on the coil and drips into a pan, known as the condensate pan.
The volume of condensate generated can be significant, especially in humid climates. This collected water must be effectively removed to prevent water damage and mold growth.
The Role of the Condensate Pump: Removing Excess Moisture
The condensate pump serves as the primary mechanism for removing the collected condensate.
It's essentially a small, specialized pump designed to automatically pump the water out of the condensate pan and away from your HVAC system.
Here's how it works:
- The condensate pan fills with water.
- A float switch inside the pump activates when the water reaches a certain level.
- The pump turns on and pumps the water through a drain line.
- Once the water level drops, the float switch deactivates, and the pump turns off.
This cycle repeats as needed, ensuring that the condensate pan never overflows. The condensate pump is especially vital when the HVAC system is located in a basement or other area where gravity drainage isn't possible.
The Importance of a Proper Drain Line: Preventing Overflows and Water Damage
The drain line is the conduit through which the condensate pump expels the collected water.
It is typically a PVC or CPVC pipe that runs from the pump to a designated drainage point, such as a floor drain, utility sink, or even an outside location.
A correctly installed drain line is essential for several reasons:
-
Preventing Overflows: A properly sized and unobstructed drain line ensures that the condensate pump can effectively discharge the water. If the drain line is clogged, undersized, or improperly sloped, it can lead to overflows, resulting in water damage.
-
Protecting Your Home: Overflows can cause water stains, mold growth, and structural damage to your home. A functioning drain line mitigates these risks by directing the water safely away from your property.
-
Maintaining System Efficiency: A properly functioning drain line helps to ensure that your AC system operates efficiently. When water is not efficiently removed, it can increase humidity levels and reduce the cooling capacity of your system.
In short, understanding the crucial role of each component – the condensate itself, the pump, and the drain line – is the first step toward ensuring a dry and healthy home environment.
Gather Your Tools and Materials: Be Prepared
With a firm understanding of your condensate system established, you're now ready to assemble the necessary tools and materials. This step is absolutely critical to a successful and efficient installation. Think of it as prepping your ingredients and workspace before attempting a new recipe.
Having everything on hand will not only save you time and frustration but will also contribute to a safer and more professional outcome. Let's delve into the specifics of what you'll need.
Essential Items: Your Must-Have Toolkit
These are the non-negotiable items that form the foundation of your condensate pump drain line installation. Each tool and material plays a vital role in ensuring a secure, leak-free, and code-compliant system.
New Condensate Pump (If Replacing)
If your existing condensate pump is failing or nearing the end of its lifespan, replacing it is a wise decision. A faulty pump can lead to significant water damage, negating the purpose of this entire project. Ensure the new pump is compatible with your HVAC system's voltage and horsepower requirements.
PVC or CPVC Pipe: The Lifeline of Your System
PVC (Polyvinyl Chloride) or CPVC (Chlorinated Polyvinyl Chloride) pipe will serve as the conduit for the condensate. The choice between the two often comes down to local building codes and temperature considerations.
PVC is generally suitable for standard condensate drainage, while CPVC offers higher temperature resistance if the drain line is near a heat source. Accurate measurement is key here. Purchase enough pipe to cover the distance from the pump's outlet to the designated drain, plus a little extra for mistakes or adjustments.
Pipe Cutter: Precision is Paramount
A clean, square cut is essential for creating a strong and leak-proof bond when joining PVC or CPVC pipes. A dedicated pipe cutter tool ensures precisely that.
Avoid using a hacksaw unless absolutely necessary, as it can produce jagged edges that compromise the integrity of the connection. Invest in a quality pipe cutter for cleaner cuts and a more professional finish.
PVC Cement: The Binding Agent
PVC cement, also known as PVC glue, is a specially formulated adhesive designed to chemically weld PVC or CPVC pipes and fittings together.
It's crucial to use the correct type of cement for the pipe material you've chosen – using the wrong cement can lead to weak joints and eventual leaks. Follow the manufacturer's instructions carefully for proper application and curing times.
Measuring Tape: Accuracy Matters
Precise measurements are essential for ensuring the drain line fits properly and directs condensate to the intended discharge point.
A reliable measuring tape is indispensable for accurately determining the required lengths of PVC or CPVC pipe. Double-check your measurements before cutting to avoid costly errors and wasted materials.
Safety Glasses and Gloves: Protection First
Safety should always be your top priority when undertaking any DIY project. Safety glasses protect your eyes from debris and splashes of PVC cement, while gloves protect your hands from chemical irritants and sharp edges.
Never compromise on personal safety equipment – it's a small investment that can prevent serious injuries.
P-Trap: Blocking Odors and Gases
A P-trap is a U-shaped fitting that traps a small amount of water in the drain line. This water barrier prevents sewer gases and foul odors from entering your home through the condensate drain.
Installing a P-trap is often required by plumbing codes and is crucial for maintaining a healthy and comfortable indoor environment.
Optional But Helpful: Enhancing Precision and Efficiency
While not strictly essential, these items can significantly streamline the installation process and ensure a more professional result.
Level: Ensuring Proper Drainage
A level is a valuable tool for ensuring the drain line slopes slightly downward from the condensate pump to the discharge point. This promotes proper drainage and prevents standing water, which can lead to clogs and mold growth. Use a level to periodically check the slope of the drain line during installation.
With your tools and materials assembled, you're now poised to tackle the installation process. This is where precision and patience become paramount. A methodical approach, coupled with a keen eye for detail, will ensure a successful and long-lasting installation.
Step-by-Step Installation Guide: A Comprehensive Approach
This section provides a detailed walkthrough of installing a condensate pump drain line. Each step is designed to be clear and actionable, guiding you from preparation to completion.
Safety First: Prioritizing Your Well-being
Before commencing any work, safety must be your foremost concern. Turn off the power to the HVAC system at the breaker box. This eliminates the risk of electrical shock during the installation.
Always wear safety glasses to protect your eyes from debris and PVC shavings. Gloves will also safeguard your hands from chemical irritants present in PVC cement. Never underestimate the importance of personal protective equipment.
Locate the Condensate Pump: Understanding the Starting Point
Identify the existing condensate pump. This is usually located near your air handler or furnace.
Note the pump's discharge point – where the existing drain line connects. This is where your new drain line will ultimately connect. Understanding the layout will streamline the installation process.
Measure and Cut the PVC Pipe: Accuracy is Key
Accurately measure the distance required for the new drain line. Consider the route the pipe will take and any bends or turns needed.
Use a pipe cutter to cut the PVC pipe to the measured length. A pipe cutter provides a clean, square cut, essential for a secure and leak-proof connection. Avoid using a saw, as it can create uneven edges.
Dry Fit: Testing the Waters Before Committing
Before applying PVC cement, assemble all the PVC pipe sections and fittings in a "dry fit." This means connecting the pieces without glue.
This step allows you to verify the measurements and ensure that all connections fit together properly. Adjustments are much easier to make at this stage.
Apply PVC Cement: Creating a Permanent Bond
This step requires careful attention to detail. Follow the manufacturer's instructions on the PVC cement can.
Apply PVC cement to both the inside of the fitting and the outside of the pipe end. Work quickly, as the cement sets rapidly.
Assemble the Drain Line: Building a Leak-Proof System
Connect all the PVC pipe sections and fittings while the PVC cement is still wet. Ensure a tight, secure fit by twisting the pieces together slightly.
A critical addition is the P-trap. Install a P-trap in the drain line to prevent sewer odors and gases from entering your home. The P-trap holds water, creating a seal.
Connect to the Discharge Point: Ensuring Proper Drainage
Securely connect the drain line to the designated plumbing discharge point. This may involve connecting to an existing drainpipe or running the line outside.
Ensure that the drain line slopes downward slightly to promote proper drainage. Avoid any upward slopes that could trap water.
Test the System: Verifying Functionality
After the PVC cement has fully cured (refer to the manufacturer's instructions for drying time), turn the power back on to the air conditioner.
Observe the condensate pump and drain line for any leaks. Check the discharge point to ensure that water is draining properly. If you detect any leaks, immediately turn off the system and address the issue.
Measure twice, cut once – that adage applies just as much to troubleshooting as it does to the initial installation. Even with meticulous installation, issues can sometimes arise. Recognizing these potential problems and knowing how to address them will ensure your condensate pump system operates efficiently and protects your home from water damage.
Troubleshooting Common Issues: Solving Problems
No installation is immune to potential hiccups. Understanding common problems and their solutions empowers you to maintain a leak-free and efficient condensate drainage system. This section addresses the most frequent issues encountered with condensate pump drain lines and provides practical, step-by-step troubleshooting guidance.
Addressing Leakage After Installation
Discovering a leak after installation can be frustrating, but it's often a simple fix. First, identify the source of the leak. Common culprits include:
- Loose Fittings: The most frequent cause.
- Improperly Applied PVC Cement: Can result in weak bonds.
- Cracked or Damaged Pipe: Especially if the pipe was mishandled.
Tightening Loose Fittings
Begin by carefully tightening all fittings. Use appropriate tools to avoid over-tightening, which could damage the PVC. If tightening doesn't resolve the issue, proceed to the next step.
Re-Applying PVC Cement
If the leak stems from a joint sealed with PVC cement, you may need to disassemble the joint, clean the surfaces thoroughly, and re-apply fresh PVC cement. Allow the cement to cure completely according to the manufacturer's instructions before testing the system again. Ensure proper ventilation when working with PVC cement.
Replacing Damaged Pipe
If you find any cracks or physical damage on the PVC pipe itself, replace the affected section immediately. Use a pipe cutter to remove the damaged section and install a new piece using PVC cement and appropriate couplings.
Clearing a Clogged Drain Line
A clogged drain line is a common problem, often resulting from algae growth or debris accumulation within the pipe. Regular preventative maintenance is the best defense against clogs, but here's how to clear one if it occurs:
Identifying the Clog
- Reduced Flow: The most obvious sign.
- Standing Water: In the condensate pump reservoir.
- Unusual Noises: From the pump struggling to operate.
Using a Wet/Dry Vacuum
The most effective method for clearing a clog is using a wet/dry vacuum. Disconnect the drain line from the condensate pump. Position the vacuum hose over the drain line opening and use short bursts of suction to dislodge the clog. Be prepared for water and debris to be extracted.
Flushing with Vinegar
Vinegar is a natural and effective cleaning agent. After vacuuming, try flushing the drain line with white vinegar. The acidity helps dissolve minor build-up and prevent future clogs. Pour the vinegar into the drain line and let it sit for at least 30 minutes before flushing with water.
Troubleshooting a Malfunctioning Condensate Pump
If the condensate pump isn't working, your AC system’s efficiency and safety are at risk. Here's how to troubleshoot:
Checking the Power Supply
Ensure the pump is receiving power. Check the breaker switch to verify that it hasn't tripped. Inspect the power cord for any damage.
Inspecting the Float Switch
The float switch activates the pump when the water level in the reservoir reaches a certain point. Check if the float switch is obstructed or stuck. Clean the reservoir and gently move the float switch to ensure it moves freely.
Cleaning the Pump
Over time, debris can accumulate inside the pump, hindering its operation. Disconnect the pump from the power supply and carefully disassemble it. Rinse all components with clean water to remove any sediment or buildup.
Considering Replacement
If the pump is old, heavily corroded, or continues to malfunction after troubleshooting, it may be time for a replacement. Replacing a faulty pump is often more cost-effective than repeated repairs. Choose a replacement pump with the same voltage and flow rate as the original.
Measure twice, cut once – that adage applies just as much to troubleshooting as it does to the initial installation. Even with meticulous installation, issues can sometimes arise. Recognizing these potential problems and knowing how to address them will ensure your condensate pump system operates efficiently and protects your home from water damage.
Preventative Maintenance: Keeping Your System Healthy
Installing a condensate pump and drain line is a significant step, but it's not a "set it and forget it" situation. To ensure your system operates reliably for years to come, proactive preventative maintenance is crucial. Neglecting regular upkeep can lead to clogs, leaks, and eventual pump failure, resulting in the very water damage you sought to prevent.
The Importance of Regular Inspections
Regular inspections are the cornerstone of any effective preventative maintenance plan. These visual checks allow you to identify potential problems early, before they escalate into costly repairs or system failures. Aim to inspect your condensate pump and drain line at least every three months, and more frequently during periods of heavy air conditioning use.
What to look for during these inspections:
-
Leaks: Carefully examine all connections, fittings, and the pump itself for any signs of moisture. Even small drips can indicate a developing problem.
-
Clogs: Check the drain line outlet for any obstructions. Also, inspect the pump reservoir for sediment or debris buildup.
-
Unusual Noises: Pay attention to any unusual sounds coming from the pump. Gurgling, grinding, or excessive noise can signal a problem with the pump motor or impeller.
-
Standing Water: Ensure the pump is effectively removing condensate and that water isn't accumulating in the HVAC unit's drain pan.
Cleaning the Condensate Pump Reservoir
The condensate pump reservoir is a prime location for algae, mold, and sediment to accumulate. This buildup can clog the pump, reduce its efficiency, and even lead to premature failure.
Regular cleaning is essential.
Here's a step-by-step guide to cleaning your condensate pump reservoir:
-
Disconnect Power: Always turn off the power to the HVAC system before working on the condensate pump. Safety first!
-
Access the Reservoir: Consult your pump's manual for instructions on accessing the reservoir. Typically, this involves removing a cover or lid.
-
Remove Debris: Use a wet/dry vacuum or a small brush to remove any visible debris, sediment, or algae from the reservoir.
-
Flush with Vinegar: Fill the reservoir with a solution of equal parts white vinegar and water. Vinegar is a natural disinfectant and helps dissolve mineral deposits.
-
Let it Soak: Allow the vinegar solution to sit in the reservoir for at least 30 minutes to loosen stubborn buildup.
-
Scrub if Necessary: If necessary, use a small brush to scrub the inside of the reservoir to remove any remaining debris.
-
Rinse Thoroughly: Rinse the reservoir thoroughly with clean water until all traces of vinegar are gone.
-
Reassemble and Test: Reassemble the pump according to the manufacturer's instructions. Restore power to the HVAC system and test the pump to ensure it's functioning properly.
Frequency: Aim to clean the condensate pump reservoir at least twice a year, or more frequently if you notice significant buildup.
By implementing these preventative maintenance steps, you'll not only extend the lifespan of your condensate pump system but also safeguard your home from the damaging effects of water leaks and overflows.
Video: Stop Leaks! Install Your Condensate Pump Drain Line Now
FAQs About Condensate Pump Drain Line Installation
Here are some frequently asked questions about installing a condensate pump drain line to prevent leaks and water damage.
Why is my AC leaking water?
Your AC is likely leaking because the condensate drain line is clogged or the condensate pump is failing. These issues prevent the water produced during the cooling process from draining properly. Learning how to install a condensate pump drain line offers a solution.
What are the benefits of installing a new drain line?
Installing a new drain line ensures efficient water removal, prevents water damage, and reduces the risk of mold growth. A correctly installed drain line is crucial for proper AC function and can save money on potential repairs. Knowing how to install a condensate pump drain line provides these benefits.
Can I install the drain line myself?
Yes, installing a condensate pump drain line is a manageable DIY project for many homeowners. However, if you're uncomfortable working with plumbing or your AC system, it's best to hire a qualified HVAC technician to avoid potentially damaging your equipment. With guidance, anyone can learn how to install a condensate pump drain line.
What materials do I need to install a condensate pump drain line?
You'll typically need PVC pipe, PVC primer and cement, a pipe cutter or saw, measuring tape, and fittings appropriate for your existing condensate pump and drain system. Knowing the right tools is key to how to install a condensate pump drain line effectively.
So, that's the scoop on how to install a condensate pump drain line! Hope this helped you get that leaky situation under control. Now go get 'em and keep those drips away!