Wiring Woes? Hunter Fan Switch Diagram Solved (Finally!)

Struggling with your Hunter ceiling fan? Understanding the wiring, especially the hunter 4 wire ceiling fan switch wiring diagram, can be tricky. Electrical safety is paramount when dealing with any wiring project; therefore, careful consideration should be given when examining your wiring. Even with a multimeter to assist, interpreting the diagram can feel like solving a complex puzzle. This article breaks down the essential steps to understand and troubleshoot your hunter 4 wire ceiling fan switch wiring diagram, guiding you through a safe and efficient process.

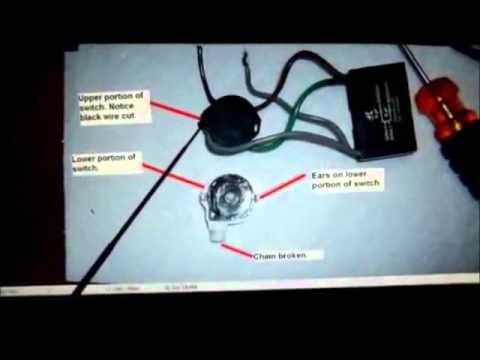
Image taken from the YouTube channel Gord's Build Lab , from the video titled Replace a 3-way 4 wire ceiling fan switch .
Deciphering the Hunter Fan Switch: A Wiring Guide
Wiring a ceiling fan, especially a Hunter fan with its sometimes-unique wiring configurations, can be a daunting task. This guide breaks down how to understand and implement a Hunter 4-wire ceiling fan switch wiring diagram, focusing on clarity and safety. Before beginning any electrical work, always turn off the power at the circuit breaker.
Understanding the Basics: Identifying Your Wires
First, accurately identify the wires you’re dealing with. This is the cornerstone of correctly implementing a hunter 4 wire ceiling fan switch wiring diagram. Typically, you'll encounter these wires:
- Black Wire (Hot): Carries the power from the circuit breaker. Usually connected to the switch's power input.
- White Wire (Neutral): Completes the circuit and is usually connected directly to the fan and light, bypassing the switch in many configurations.
- Blue Wire (Light): Controls the fan's light kit. Connects from the switch to the light kit.
- Red Wire (Fan): Controls the fan motor. Connects from the switch to the fan motor.
-
Green or Bare Wire (Ground): Safety wire that protects against electrical shock. Connects to the grounding screw in the electrical box and on the fan.
Important Note: Wire colors can sometimes vary. Use a voltage tester to confirm the function of each wire before making any connections.
Deciphering the Hunter 4-Wire Switch Wiring Diagram
The most crucial step is to accurately understand the specific hunter 4 wire ceiling fan switch wiring diagram relevant to your fan model. Hunter fans often come with slightly different configurations. Consulting the specific diagram for your fan model is paramount. Look for the diagram included with your fan's documentation or search online using your fan's model number.
Interpreting Diagram Symbols
Fan wiring diagrams often use specific symbols to represent components and connections. Common symbols include:
- Line (Solid): Represents a wire.
- Circle with X: Represents a wire connection.
- Rectangle with Switch Icon: Represents the wall switch.
- Light Bulb Icon: Represents the light fixture.
- Fan Blade Icon: Represents the fan motor.
Common Wiring Scenarios: A Breakdown
While specific diagrams vary, some common wiring scenarios exist for a Hunter 4-wire switch:
-
Separate Light and Fan Control: This is the most common scenario.
- The Black wire (Hot) from the breaker connects to the switch's power input (often a common terminal).
- The Blue wire (Light) connects from the switch to the fan's light kit.
- The Red wire (Fan) connects from the switch to the fan motor.
- The White wire (Neutral) is connected directly to both the light kit and fan motor, bypassing the switch.
- The Green/Bare wire (Ground) connects to the grounding screw.
-
Variable Speed Control: Some Hunter fans use a 4-wire switch to control fan speed directly. In this case, the Red wire might be replaced with multiple wires (e.g., Red, Brown, Orange) representing different fan speeds. The diagram will clearly indicate which wire corresponds to which speed.
Step-by-Step Wiring Process
Once you've understood the hunter 4 wire ceiling fan switch wiring diagram, follow these steps:
- Safety First: Turn off the power at the circuit breaker!
- Prepare the Wires: Strip about ½ inch of insulation from the end of each wire.
- Make the Connections: Connect the wires according to the diagram. Use wire connectors (wire nuts) to securely join the wires. Ensure the connections are tight and secure.
- Match the colors shown in the
hunter 4 wire ceiling fan switch wiring diagramto the corresponding wires in the electrical box and on the fan.
- Match the colors shown in the
- Grounding: Connect the green or bare copper ground wire to the grounding screw in the electrical box and on the fan.
- Secure the Connections: Carefully tuck the wires back into the electrical box. Avoid pinching or damaging the wires.
- Install the Switch: Mount the switch in the electrical box and secure it with screws.
- Restore Power: Turn the power back on at the circuit breaker.
- Test the Fan: Test the fan and light to ensure they are functioning correctly.
Troubleshooting Common Wiring Issues
If the fan or light doesn't work after wiring, check the following:
- Loose Connections: The most common issue. Ensure all wire connections are tight and secure.
- Incorrect Wiring: Double-check the wiring against the
hunter 4 wire ceiling fan switch wiring diagram. Even a small mistake can prevent the fan from working correctly. - Faulty Switch: Use a multimeter to test the switch. If the switch is faulty, replace it.
- Tripped Circuit Breaker: Check the circuit breaker to ensure it hasn't tripped. Reset the breaker if necessary.
- Bulb or Light Kit Issue: Ensure the light bulb is working and properly installed. Check the light kit wiring if the bulb is good.
Using a Multimeter for Verification
A multimeter is a valuable tool for diagnosing wiring problems. You can use it to:
- Verify Power: Confirm that the black wire is carrying power.
- Test Continuity: Check that the switch is functioning correctly and making a good connection when turned on.
- Identify Wires: If you're unsure about the identity of a wire, you can use a multimeter to trace it back to its source.
Multimeter Settings
When using a multimeter for wiring projects, be sure to set it to the correct mode:
- Voltage (AC): Used to check for the presence of voltage on the hot (black) wire.
- Continuity: Used to check if a circuit is complete or broken.
Video: Wiring Woes? Hunter Fan Switch Diagram Solved (Finally!)
Wiring Woes? Hunter Fan Switch Diagram Solved: FAQs
Here are some frequently asked questions to help you troubleshoot your Hunter ceiling fan switch wiring.
What if the colors on my Hunter fan wires don't match the diagram?
Wire colors can sometimes vary slightly. The key is to identify the function of each wire. Use a multimeter to test continuity and voltage, comparing the results to a hunter 4 wire ceiling fan switch wiring diagram. Always prioritize understanding the circuit over relying solely on color.
My fan only works on one speed after wiring. What did I do wrong?
This usually indicates a wiring error, most likely with the speed control wires. Double-check your connections against a hunter 4 wire ceiling fan switch wiring diagram, paying close attention to which wire controls each speed setting.
How can I be sure I've properly identified the line and load wires?
The line wire brings power from the breaker, and the load wire carries power to the fan. Use a non-contact voltage tester to identify the line wire. Then confirm the load wires using a hunter 4 wire ceiling fan switch wiring diagram. Turn off the breaker before testing.
What safety precautions should I take when working with electrical wiring?
Always turn off the circuit breaker supplying power to the fan before working on any wiring. Use insulated tools, and if you are unsure about any step, consult a qualified electrician. A hunter 4 wire ceiling fan switch wiring diagram can be a guide, but safety always comes first.